How do I get Office timeline in PowerPoint?
How do I get Office timeline in PowerPoint?
Select COM Add-ins in the Manage drop-down list and press Go. In the COM Add-Ins dialog box, check Office Timeline and un-check all other add-ins (you can re-enable them one at a time later). Click OK. PowerPoint will add Office Timeline to the ribbon.
What is PowerPoint timeline pro?
The Office Timeline Pro add-in for PowerPoint turns complicated project data into beautiful slides that execs will easily understand. Office Timeline does exactly that. It is easy to use, saves me time and produces professional looking timelines.
What is a timeline PowerPoint?
Microsoft PowerPoint enables users to create a basic timeline that they can manually adjust and restyle to fit their needs. The result is a simple graphic fit for presentations to clients or executives, but not quite flexible enough for those who need to show more accurate details or update the timeline regularly.
Is Office timeline included in PowerPoint?
Welcome to Office Timeline Free – we’re glad you’re here! Office Timeline Add-in Free is a lightweight PowerPoint add-in that lets you quickly make and manage beautiful timelines, Gantt charts and Swimlane slides with up to 10 milestones and tasks.
How much is PowerPoint timeline?
Office Timeline is available for download free. The premium Plus version is priced at $59 for 1-year license. It includes additional graphics, Excel and MS Project import, unlimited product updates, and free technical support.
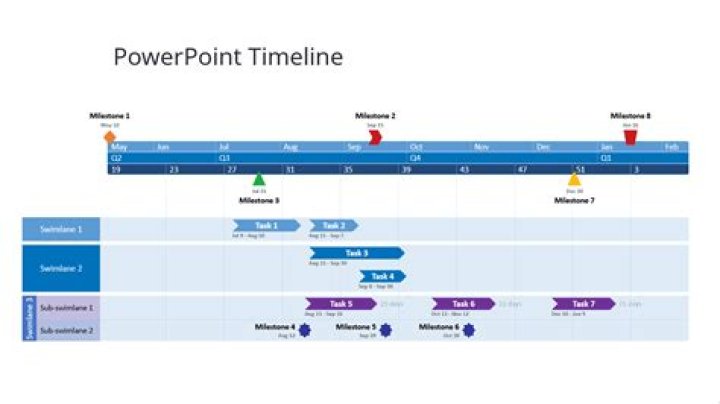
How do I create a dynamic timeline in PowerPoint?
1. Get Started
- Create a new PowerPoint presentation or open an existing one.
- Then go to the INSERT tab and click on SmartArt.
- Select Process on the left and pick the design of the timeline you like in the central pane.
- The timeline will be created with three elements.
- Fill in additional text for your Timeline.
How do I create an interactive timeline in PowerPoint?
How To Create An Interactive Timeline Or Map With PowerPoint
- Design Your Map.
- Use The Slide Master.
- Insert Textboxes And Pins.
- Select All The Pins.
- Add As Many Slides As The Pins You Added.
- Make Pins Clickable.
- Link The Pins With Each Slide.
- Modify Your Slides.